 14-提高交互性
原文链接:https://nextjs.org/learn/dashboard-app/improving-accessibility (opens new window)
在前一章中,我们研究了如何捕获错误(包括404个错误)并向用户显示回退。然而,我们仍然需要讨论另一个难题:表单验证。让我们看看如何使用服务器操作实现服务器端验证,以及如何使用React的[useActionState](https://react.dev/reference/react/useActionState)钩子显示表单错误-同时牢记访问便捷性!
# 本章目标
- 如何使用
eslint-plugin-jsx-a11y让Next.js实现无障碍性最佳实践。 - 如何实现服务器端表单验证。
- 如何使用React
useActionState钩子来处理表单错误,并将其显示给用户。
# 什么是可访问便捷性
无障碍是指设计和实现人人都可以使用的网络应用程序,包括残疾人。这是一个涉及许多领域的庞大主题,如键盘导航、语义HTML、图像、颜色、视频等。 虽然我们不会在本课程中深入讨论可访问性,但我们将讨论Next.js中提供的可访问性功能,以及使您的应用程序更易于访问的一些常见做法。 如果您想了解更多关于无障碍 (opens new window)的信息,我们建议您通过web.dev (opens new window)学习无障碍课程 (opens new window)。
# 在next中使用eslint插件
Next.js在其eslint配置中包括[eslint-plugin-jsx-a11y](https://www.npmjs.com/package/eslint-plugin-jsx-a11y)插件,以帮助尽早发现可访问性问题。例如,这个插件警告说,如果你有没有alt文本的图像,使用aria-*和角色属性不正确,等等。
可以在您的package.json文件中添加下一个lint作为脚本:
"scripts": {
  "build": "next build",
  "dev": "next dev",
  "start": "next start",
  "lint": "next lint"
},
2
3
4
5
6
然后在终端中运行pnpm lint:
pnpm lint
这将指导您为项目安装和配置ESLint。如果您现在要运行pnpm lint,您应该会看到以下输出:
No ESLint warnings or errors
然而,如果你有一张没有alt文本的图片,会发生什么?让我们来看看!
跳转到/app/ui/vinvoits/table.tsx文件中并从图像中删除alt prop。您可以使用编辑器的搜索功能快速查找<Image>:
<Image
  src={invoice.image_url}
  className="rounded-full"
  width={28}
  height={28}
  alt={`${invoice.name}'s profile picture`} // Delete this line
/>
2
3
4
5
6
7
现在再次运行pnpm lint,您应该会看到以下警告:
./app/ui/invoices/table.tsx
45:25  Warning: Image elements must have an alt prop,
either with meaningful text, or an empty string for decorative images. jsx-a11y/alt-text
2
3
虽然添加和配置 Eslinter 不是必需的步骤,但它可以帮助您在开发过程中发现可访问性问题。
# 提高表单form的可访问性
我们已经在做三件事来提高表格的可访问性:
- Semantic HTML: 使用语义元素(
<input>、<option>等)而不是<div>,这允许辅助技术(AT)专注于输入元素并向用户提供适当的上下文信息,使表单更易于导航和理解。 - Labelling: 包括<label>和htmlFor属性可确保每个表单字段都有一个描述性文本标签。这通过提供上下文来改进AT支持,还通过允许用户点击标签来关注相应的输入字段来增强可用性。
- Focus Outline: 字段经过适当的样式设置,以便在它们处于焦点时显示轮廓。这对于可访问性至关重要,因为它在视觉上指示页面上的活动元素,帮助键盘和屏幕阅读器用户了解他们在表单上的位置。您可以通过按tab键来验证这一点。
这些实践为许多用户更容易访问表单奠定了良好的基础。但是,它们不涉及表单验证和错误。
# 表单校验
跳转到 http://localhost:3000/dashboard/invoices/create (opens new window),然后提交一个空表单。会发生什么? 你将会收到一个错误!这是因为您正在向服务器操作发送空表单值。您可以通过在客户端或服务器上验证表单来防止这种情况发生。
# 客户端验证
有几种方法可以在客户端上验证表单。最简单的方法是依靠浏览器提供的表单验证,将所需的属性添加到表单中的<input>和<select>元素中。例如:在第7行添加required
<input
  id="amount"
  name="amount"
  type="number"
  placeholder="Enter USD amount"
  className="peer block w-full rounded-md border border-gray-200 py-2 pl-10 text-sm outline-2 placeholder:text-gray-500"
  required
/>
2
3
4
5
6
7
8
再次提交表单,如果您尝试提交具有空值的表单,您现在应该会在浏览器中看到警告。
这种方法通常是可以的,因为有些AT支持浏览器验证。
客户端验证的另一种选择是服务器端验证。让我们在下一节中看看如何实现它。现在如果添加required的属性,请删除它们。
# 服务端校验
通过验证服务器上的表单,您可以:
- 在将数据发送到数据库之前,请确保数据的 格式符合要求。
- 降低恶意用户绕过客户端验证的风险。
- 对于被认为有效的数据,有一个真实的来源。
在create-form.tsx组件中,导入 import { useActionState } from'react'; useActionState hooks;由于useActionState是一个钩子,您需要使用'use client'指令将表单转换为客户端组件:
'use client';

// ...
import { useActionState } from 'react';
2
3
4
在表单组件内部,useActionState钩子:
- 需要2个参数:(action, initialState)
- 返回两个值:[state,formAction]-表单状态,以及在提交表单时要调用的函数。
将createInvoice操作作为useActionState的参数传递,并在<form action={}>属性内调用formAction。
// ...
import { useActionState } from 'react';

export default function Form({ customers }: { customers: CustomerField[] }) {
  const [state, formAction] = useActionState(createInvoice, initialState);

  return <form action={formAction}>...</form>;
}
2
3
4
5
6
7
8
initialState可以是您定义的任何东西,在这种情况下,创建一个具有两个空键的对象:message和errors,并从actions.ts文件导入State类型:
// ...
import { createInvoice, State } from '@/app/lib/actions';
import { useActionState } from 'react';

export default function Form({ customers }: { customers: CustomerField[] }) {
  const initialState: State = { message: null, errors: {} };
  const [state, formAction] = useActionState(createInvoice, initialState);

  return <form action={formAction}>...</form>;
}
2
3
4
5
6
7
8
9
10
这一开始可能看起来很混乱,但一旦更新了服务器操作,就会更有意义。让我们现在就这么做吧。 在action.ts文件中,您可以使用Zod来验证表单数据。按如下方式更新FormSchema:
const FormSchema = z.object({
  id: z.string(),
  customerId: z.string({
    invalid_type_error: 'Please select a customer.',
  }),
  amount: z.coerce
    .number()
    .gt(0, { message: 'Please enter an amount greater than $0.' }),
  status: z.enum(['pending', 'paid'], {
    invalid_type_error: 'Please select an invoice status.',
  }),
  date: z.string(),
});
2
3
4
5
6
7
8
9
10
11
12
13
customerId:如果customer字段为空,Zod已经抛出了一个错误,因为它需要一个类型字符串。但如果用户没有选择customer,提示让我们添加一条数据的消息。amount:由于强制将amount类型从字符串转换为数字,因此如果字符串为空,则默认为零。让我们告诉Zod,我们总是希望通过.gt()函数获得大于0的值。status:如果状态字段为空,Zod已经抛出一个错误,因为它期望“pending”或“paid”。如果用户没有选择状态,我们还可以添加一条友好消息。
接下来,更新createInvoice操作以接受两个参数-prevState和formData:
export type State = {
  errors?: {
    customerId?: string[];
    amount?: string[];
    status?: string[];
  };
  message?: string | null;
};

export async function createInvoice(prevState: State, formData: FormData) {
  // ...
}
2
3
4
5
6
7
8
9
10
11
12
- formData: 和之前一致
- prevState:包含从useActionState钩子传递的状态。在本例中,您不会在 action 中使用它,但它是必需的prop。
然后,将Zod-parse()函数更改为safeParse():
export async function createInvoice(prevState: State, formData: FormData) {
  // Validate form fields using Zod
  const validatedFields = CreateInvoice.safeParse({
    customerId: formData.get('customerId'),
    amount: formData.get('amount'),
    status: formData.get('status'),
  });

  // ...
}
2
3
4
5
6
7
8
9
10
safeParse()将返回一个包含成功或错误字段的对象。这将有助于更优雅地处理验证,而无需将此逻辑放入try/catch块中。
在将信息发送到数据库之前,请检查表单字段是否使用条件进行了正确验证:
export async function createInvoice(prevState: State, formData: FormData) {
  // Validate form fields using Zod
  const validatedFields = CreateInvoice.safeParse({
    customerId: formData.get('customerId'),
    amount: formData.get('amount'),
    status: formData.get('status'),
  });

  // If form validation fails, return errors early. Otherwise, continue.
  if (!validatedFields.success) {
    return {
      errors: validatedFields.error.flatten().fieldErrors,
      message: 'Missing Fields. Failed to Create Invoice.',
    };
  }

  // ...
}
2
3
4
5
6
7
8
9
10
11
12
13
14
15
16
17
18
19
如果validatedFields不成功,我们会提前返回函数,并从Zod返回错误消息。
提示:打印 validatedFields 并提交一个空表单以查看其 props。
最后,由于您在try/catch块之外单独处理表单验证,因此您可以针对任何数据库错误返回特定消息,因此您的最终代码应该如下所示:
export async function createInvoice(prevState: State, formData: FormData) {
  // Validate form using Zod
  const validatedFields = CreateInvoice.safeParse({
    customerId: formData.get('customerId'),
    amount: formData.get('amount'),
    status: formData.get('status'),
  });

  // If form validation fails, return errors early. Otherwise, continue.
  if (!validatedFields.success) {
    return {
      errors: validatedFields.error.flatten().fieldErrors,
      message: 'Missing Fields. Failed to Create Invoice.',
    };
  }

  // Prepare data for insertion into the database
  const { customerId, amount, status } = validatedFields.data;
  const amountInCents = amount * 100;
  const date = new Date().toISOString().split('T')[0];

  // Insert data into the database
  try {
    await sql`
      INSERT INTO invoices (customer_id, amount, status, date)
      VALUES (${customerId}, ${amountInCents}, ${status}, ${date})
    `;
  } catch (error) {
    // If a database error occurs, return a more specific error.
    return {
      message: 'Database Error: Failed to Create Invoice.',
    };
  }

  // Revalidate the cache for the invoices page and redirect the user.
  revalidatePath('/dashboard/invoices');
  redirect('/dashboard/invoices');
}
2
3
4
5
6
7
8
9
10
11
12
13
14
15
16
17
18
19
20
21
22
23
24
25
26
27
28
29
30
31
32
33
34
35
36
37
38
很好,现在让我们显示表单组件中的错误。回到create-form.tsx组件,您可以使用表单状态访问错误。 添加一个 三元运算符 ,用于检查每个特定错误。例如,在客户字段后,可以添加:
<form action={formAction}>
  <div className="rounded-md bg-gray-50 p-4 md:p-6">
    {/* Customer Name */}
    <div className="mb-4">
      <label htmlFor="customer" className="mb-2 block text-sm font-medium">
        Choose customer
      </label>
      <div className="relative">
        <select
          id="customer"
          name="customerId"
          className="peer block w-full rounded-md border border-gray-200 py-2 pl-10 text-sm outline-2 placeholder:text-gray-500"
          defaultValue=""
          aria-describedby="customer-error"
        >
          <option value="" disabled>
            Select a customer
          </option>
          {customers.map((name) => (
            <option key={name.id} value={name.id}>
              {name.name}
            </option>
          ))}
        </select>
        <UserCircleIcon className="pointer-events-none absolute left-3 top-1/2 h-[18px] w-[18px] -translate-y-1/2 text-gray-500" />
      </div>
      <div id="customer-error" aria-live="polite" aria-atomic="true">
        {state.errors?.customerId &&
          state.errors.customerId.map((error: string) => (
            <p className="mt-2 text-sm text-red-500" key={error}>
              {error}
            </p>
          ))}
      </div>
    </div>
    // ...
  </div>
</form>
2
3
4
5
6
7
8
9
10
11
12
13
14
15
16
17
18
19
20
21
22
23
24
25
26
27
28
29
30
31
32
33
34
35
36
37
38
在上面的代码中,您还添加了以下aria labels:
aria-describedby="customer-error":这将在select元素和错误消息容器之间建立关系。它表示id=“customer error”的容器描述了select元素。当用户与选择框交互以通知他们错误时,屏幕阅读器将阅读此描述。id="customer-error":此id属性唯一标识HTML元素,该元素保存选择输入的错误消息。这对于aria-describedby所描述的建立关系是必要的。- aria-live="polite":当div内部的错误被更新时,屏幕阅读器应该礼貌地通知用户。当内容发生变化时(例如,当用户更正错误时),屏幕阅读器将宣布这些变化,但仅当用户空闲时,以免中断这些变化。
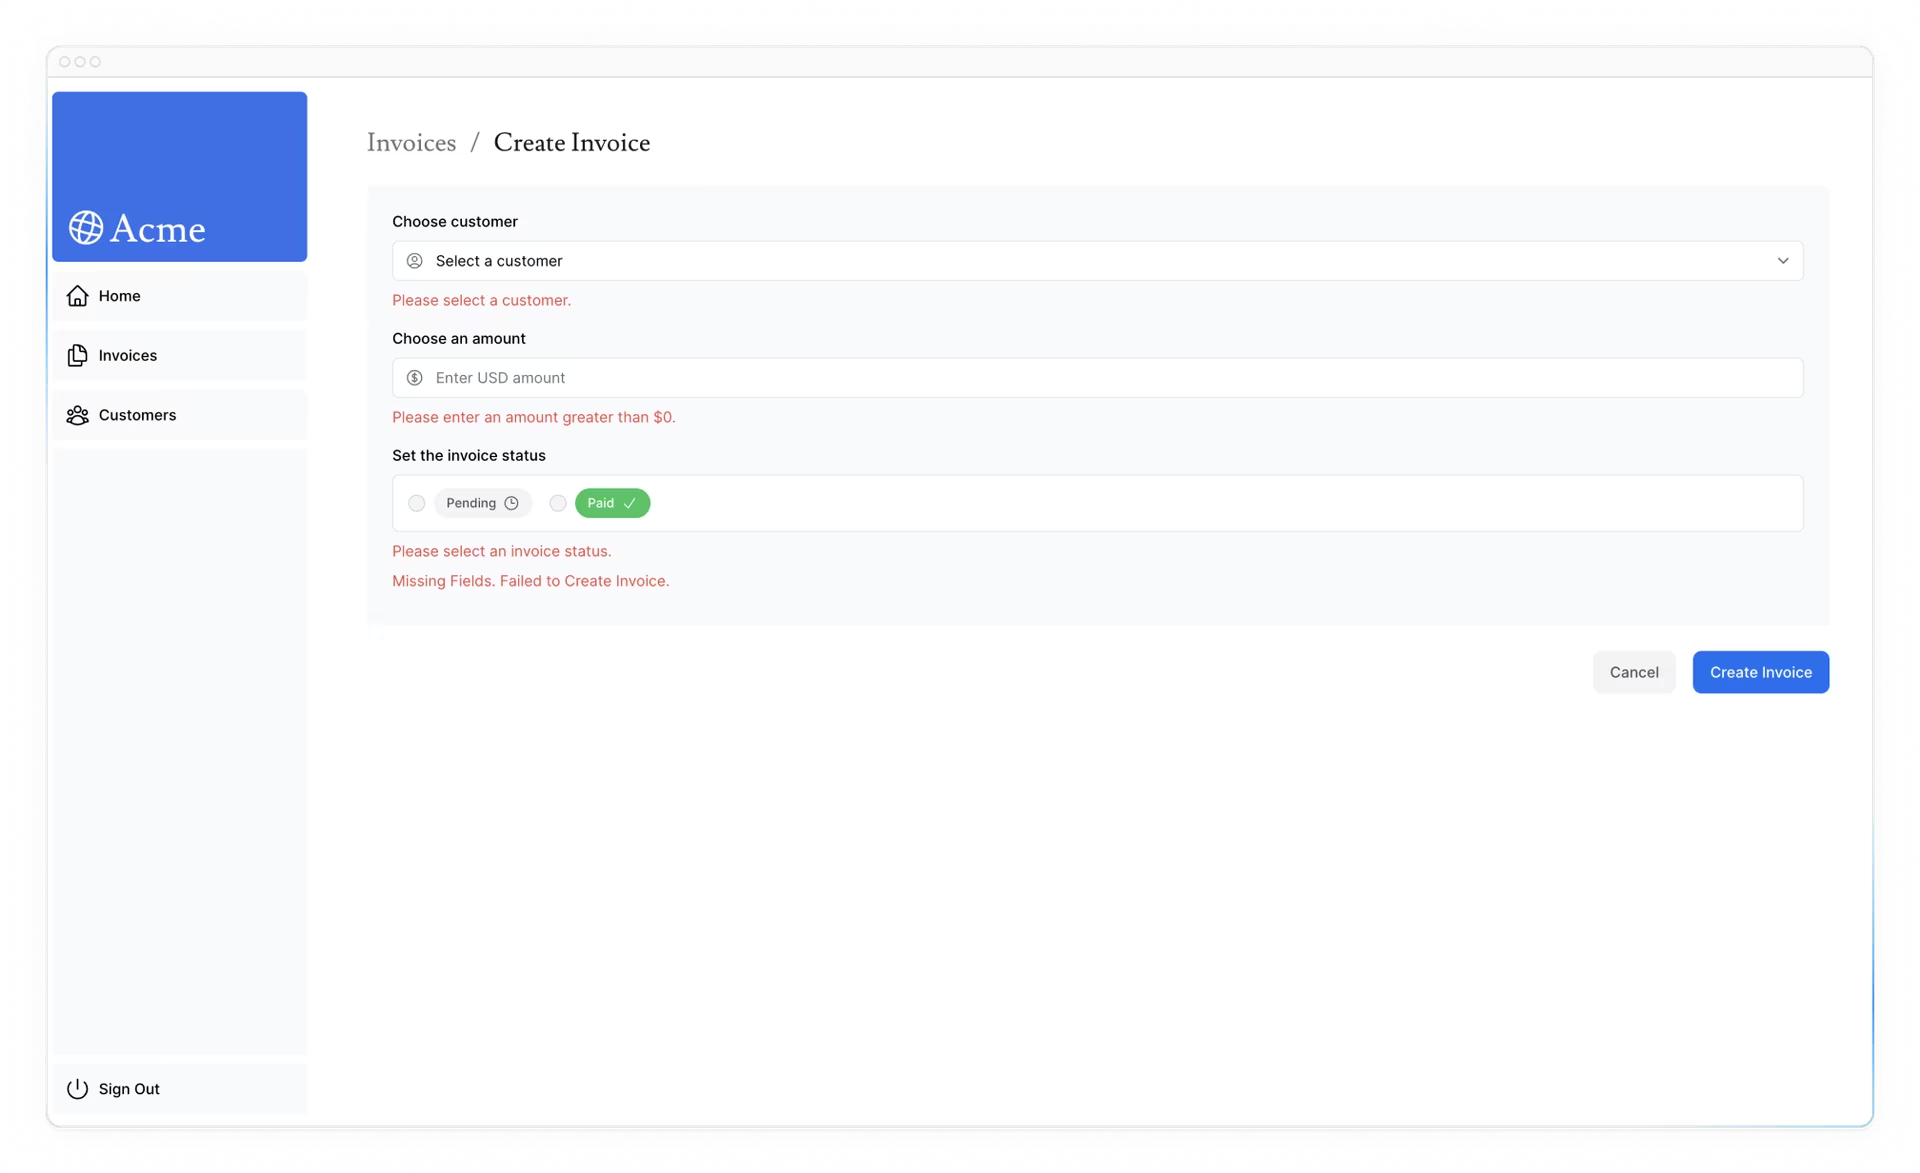
# 练习添加aria labels
使用上面的示例,将错误添加到剩余的表单字段中。如果缺少任何字段,还应在表单底部显示一条消息。您的UI应该如下所示:
 准备好后,运行pnpm lint检查您是否正确使用了 aria labels。
如果你想挑战自己,可以利用本章中学到的知识,将表单验证添加到edit-form.tsx组件中。
您需要:
准备好后,运行pnpm lint检查您是否正确使用了 aria labels。
如果你想挑战自己,可以利用本章中学到的知识,将表单验证添加到edit-form.tsx组件中。
您需要:
- 将useActionState添加到edit-form.tsx组件中。
- 编辑updateInvoice操作以处理Zod中的验证错误。
- 显示组件中的错误,并添加aria labels以提高可访问性。
准备好后,展开下面的代码片段以查看解决方案: Edit Invoice Form:
export default function EditInvoiceForm({
  invoice,
  customers,
}: {
  invoice: InvoiceForm;
  customers: CustomerField[];
}) {
  const initialState = { message: null, errors: {} };
  const updateInvoiceWithId = updateInvoice.bind(null, invoice.id);
  const [state, formAction] = useActionState(updateInvoiceWithId, initialState);

  return <form action={formAction}></form>;
}
2
3
4
5
6
7
8
9
10
11
12
13
Server Action:
export async function updateInvoice(
  id: string,
  prevState: State,
  formData: FormData,
) {
  const validatedFields = UpdateInvoice.safeParse({
    customerId: formData.get('customerId'),
    amount: formData.get('amount'),
    status: formData.get('status'),
  });

  if (!validatedFields.success) {
    return {
      errors: validatedFields.error.flatten().fieldErrors,
      message: 'Missing Fields. Failed to Update Invoice.',
    };
  }

  const { customerId, amount, status } = validatedFields.data;
  const amountInCents = amount * 100;

  try {
    await sql`
      UPDATE invoices
      SET customer_id = ${customerId}, amount = ${amountInCents}, status = ${status}
      WHERE id = ${id}
    `;
  } catch (error) {
    return { message: 'Database Error: Failed to Update Invoice.' };
  }

  revalidatePath('/dashboard/invoices');
  redirect('/dashboard/invoices');
}
2
3
4
5
6
7
8
9
10
11
12
13
14
15
16
17
18
19
20
21
22
23
24
25
26
27
28
29
30
31
32
33
34